Thursday, October 27, 2011

True Blood/Vampy look

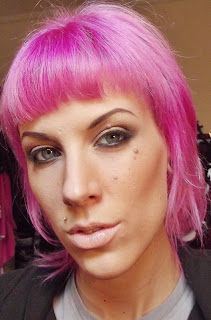
Here is my second look using the True Blood palette. I went for a more "vampy vixen" type look, but not the same look provided in the palette.

This time I used the Tarte eye primer to give that a whirl. I like, but I am just not a fan of the doe foot applicator it and UD's primer has. I would rather be able to have a jar. Just personal preference, the primer itself works very well. I took Stake and applied it all over the lid and into the crease. I then took Immortal to deepend the crease and the outer V. I took Werewolf to the crease and used the Light under the brow. I put a little True Death in the tearduct and used "V" under the lower lash line and extended it out to the V. (haha!) Smolder eye kohl on upper lash line and waterline and a coat of False Lashes Mascara! I paired it with Prolingwear Lipglass in Lasting Achievement.

True Blood/Bombshell Tutorial

I wanted to do a couple looks using my Tarte for True Blood Palette (cuz I love it so). First look I did a legit tutorial...its my first so bear with me! I wanted to do a "Victoria's Secret" Bombshell look, or at least my version haha.
Here we go!
First, apply a good eye primer, in this case I used MAC's Paintpot in painterly


Next, apply Dawn all over the lid.


Then, take Bayou to the outer corner of lid.


Then, using a crease brush, I used MAC's 226 (my fav!) pick up Werewolf and create your outer 'V'. Blend it out using a #217 brush.
Then, using a #219, pick up Legend and darken the outer corner and crease, a mini-V if you will. Take the #217 again and blend those 2 together.  Pick up a little Dusk and soften the crease with that. Pick up a little more Bayou and dust under the browbone.


Take you #219 and some Werewolf and smudge under your lashline. Take your favorite black eye kohl (I used MAC's smolder) and line your waterline and along lashline. Add some mascara and Voila!
I applied a little contouring and Gingerly Blush to the cheekbones. I put on Fleshpot lipstick for a pouty lip look.

Christian Dior Inspired Look/ Tarina Tarantino review

So I went to Sephora yesterday, and happend to browse their clearance section and found 3 amazing Tarino Tarantino products for $5 a piece!! I got one of her cream shadows in Black Diamond, which after coming home and opening it I realized it was almost dried up. Still usable, but damn me for not checking first. I also got 2 of her hyper shadows, Toyko Hardcore and Candy Cameo.

The Candy Cameo is a nice deep warm pink with minimal glitter. Toyko Hardcore is a lime green. It looks dull on a single swipe, but on packing the color on it is very bright which made me happy. Poor yellow to it, which makes it more neon looking in my opinion. The cream shadow was a little bit of a disappointment. I swatched MAC's Blackground next to it and it is much more pigmented. I think because it was dried out it had a lack of oompf.

I paired it with Candy Yum-Yum Lipstick instead of the red :) 


Monday, October 17, 2011

White & Blue

 Here is a look I did because I got a new brush I couldn't wait to try out! It's MACs #231 brush. I wanted something to help with more crisp lines for the crease. I love the #219, but it gets blurry sometimes. I like a nice "drag" crease. Haha, my definition.

So really, this is my usual everyday style of makeup.

I used Gesso on the lid, Styledriven in the crease and Deep Truth to sharpen. I had some leftover lash-bits from a pair I trimmed down to fit and used that in the corners. 


 I also was really focusing on keeping my liner as crisp as possible without any jumpy lines. I am very happy with how it turned out!
Better look at the lashes.


I also used Coygirl blush and Fleshpot lipstick!!

Quasi-Kardasian

I woke up on the first day of my vacation thinking about all the Kim Kardashian looks everywhere. And at my counter I am constantly getting asked that! I swear I do something new everytime, here was a half-face of one I came up with. I think I am going to do this one again so I can take better pictures, and of course write down what I used!!

Random Brightness

Only pic I took of this, but it was fun. For a theme-day at work using the new MAC Fall Collection line!

Bundle Monster Quick Review

So I ordered up a Bundle Monster 88 palette just to have around. If you have not heard of them, I am not surprised. But it is the exact same thing as Coastal Scents, but I found on Amazon for $10 :) 


So as all the others, you get your dime-sized shadows in 88 colors. Although there are a few I swear are the same shade but what can ya do? They have a cheap smell to them (which I can't stand) but I am excited to have so many colors. I did a few swatches on my arm, they are pretty chaulky for the most part some are extremely pigmented and others are a little chaulky. I did a quick 5 min look using some of the colors. 

Can definitely tell some need a little bit more work then others. I wanted the orange to be brighter and it wasn't so I added MAC's orange to it.

True Blood Palette

So I got the True Blood palette (naturally like 3 months ago haha) and I absolutely love it! If I have the time (or if anyone cares) I will do a review. But I through this on real quick while I ran some errands today (hence the beret haha)

 I followed the "Not Your Average Waitress" Look that came with the palette, except I lined my eyes with Teddy Eye Kohl instead to soften the look. Another blue-eye poppin' look!

Peach and Coral Look

Please don't mind my sloppy liner haha. But this was a quick look I did before dinner with my mother last week. I wanted to go with the Fall themed look I did before, but one that can go for Spring too! 

Here's what you need!
Dazzlelight e/s
Perky e/s
Hot Hot Hot e/s
Tempting e/s

Along the lines of my usual looks, I dabbed some Dazzlelight on the inner third, swept Perky through the middle and used Hot Hot Hot in the outer corner. I blended them all together with Tempting in the crease. And Dazzlelight under the brow!

Fall look!

 I wanted to do a look with orange that was easily wearable. I paired it with browns for a beautiful Fall look. This look is a double-whammy for those with blue eyes! The oranges and browns bring out the blue like crazy!


So here's what you need:
Dazzlelight e/s
Orange e/s
Espresso e/s
Cork e/s


Start off with a good base, I always turn to my Painterly p/p. Then starting from the inner corner to 2/3 of the way I swept on Dazzlelight. In the outer corner I packed on Orange. Then using a pencil brush (#219 is my fav) I created my outer V using Espresso. I took in into the crease and softly blended. I then used a fluffy brush and blended the Espresso with Cork to soften the look. Then take a bit of your Dazzlelight under the brow and blending into the Cork. Liner, mascara Voila!
Ok! So it has been SUCH a long time since I have posted anything! I am working on that! I have tons of looks I have done and took pictures of but never posted! So here is the haul of pics!! 


So I ordered me up some Geo Nudy Blue circle lenses, was extremely paranoid I would never get them in because I have NEVER worn contacts before! But I did! So I took a side pic of what they looked like. The second image was a quick Barbie look I did with the lens in.